Whats the Largest File You Can Upload to S3
When working with Amazon S3 (Simple Storage Service), you're probably using the S3 web panel to download, copy, or upload files to S3 buckets. Using the panel is perfectly fine, that's what it was designed for, to begin with.
Especially for admins who are used to more mouse-click than keyboard commands, the web console is probably the easiest. Withal, admins will eventually see the need to perform majority file operations with Amazon S3, like an unattended file upload. The GUI is not the all-time tool for that.
For such automation requirements with Amazon Spider web Services, including Amazon S3, the AWS CLI tool provides admins with command-line options for managing Amazon S3 buckets and objects.
In this commodity, you lot will acquire how to use the AWS CLI control-line tool to upload, copy, download, and synchronize files with Amazon S3. Y'all will also larn the basics of providing access to your S3 bucket and configure that access profile to work with the AWS CLI tool.
Prerequisites
Since this a how-to article, at that place will be examples and demonstrations in the succeeding sections. For you to follow forth successfully, you will need to encounter several requirements.
- An AWS business relationship. If you don't have an existing AWS subscription, you tin sign upwards for an AWS Gratuitous Tier.
- An AWS S3 bucket. You can use an existing bucket if you'd prefer. However, it is recommended to create an empty saucepan instead. Delight refer to Creating a bucket.
- A Windows 10 computer with at least Windows PowerShell 5.1. In this article, PowerShell vii.0.2 volition be used.
- The AWS CLI version 2 tool must be installed on your computer.
- Local folders and files that you will upload or synchronize with Amazon S3
Preparing Your AWS S3 Admission
Suppose that y'all already have the requirements in place. You lot'd retrieve you can already go and start operating AWS CLI with your S3 bucket. I mean, wouldn't information technology be nice if it were that simple?
For those of y'all who are just beginning to work with Amazon S3 or AWS in general, this section aims to help you set up access to S3 and configure an AWS CLI contour.
The full documentation for creating an IAM user in AWS tin be plant in this link below. Creating an IAM User in Your AWS Account
Creating an IAM User with S3 Admission Permission
When accessing AWS using the CLI, yous will need to create one or more IAM users with enough access to the resource you intend to piece of work with. In this department, you will create an IAM user with access to Amazon S3.
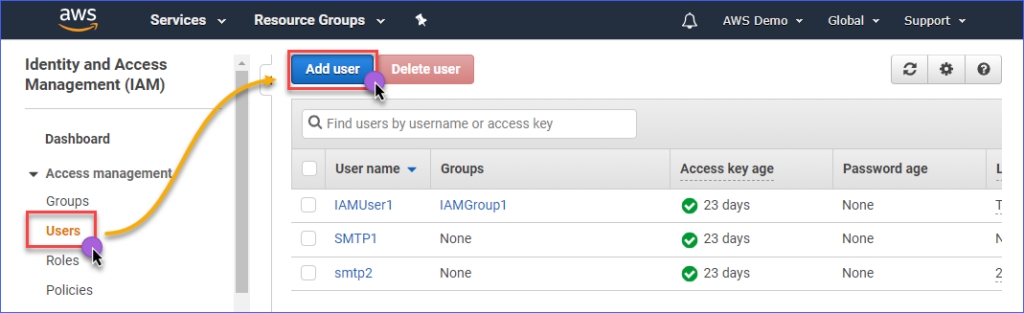
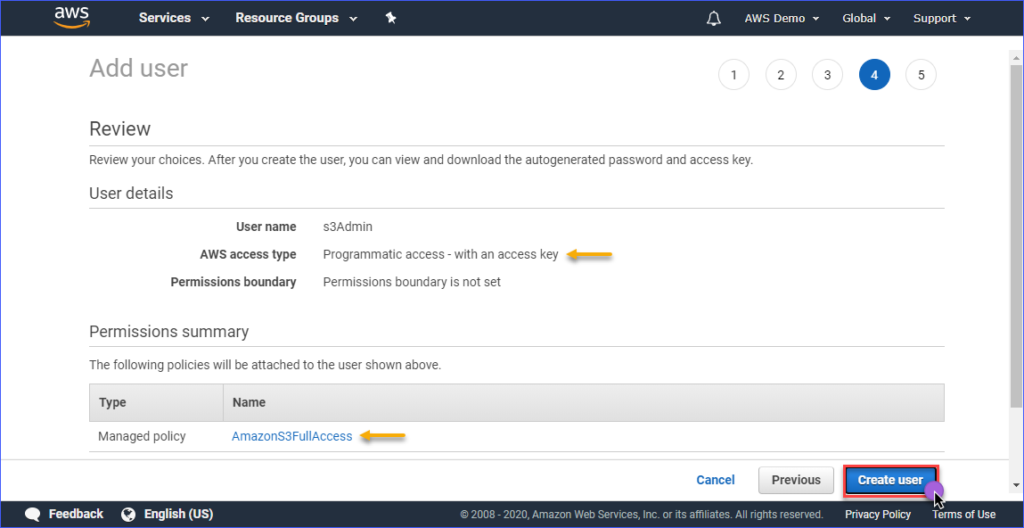
To create an IAM user with access to Amazon S3, you first demand to login to your AWS IAM console. Under the Admission management grouping, click on Users. Next, click on Add user.
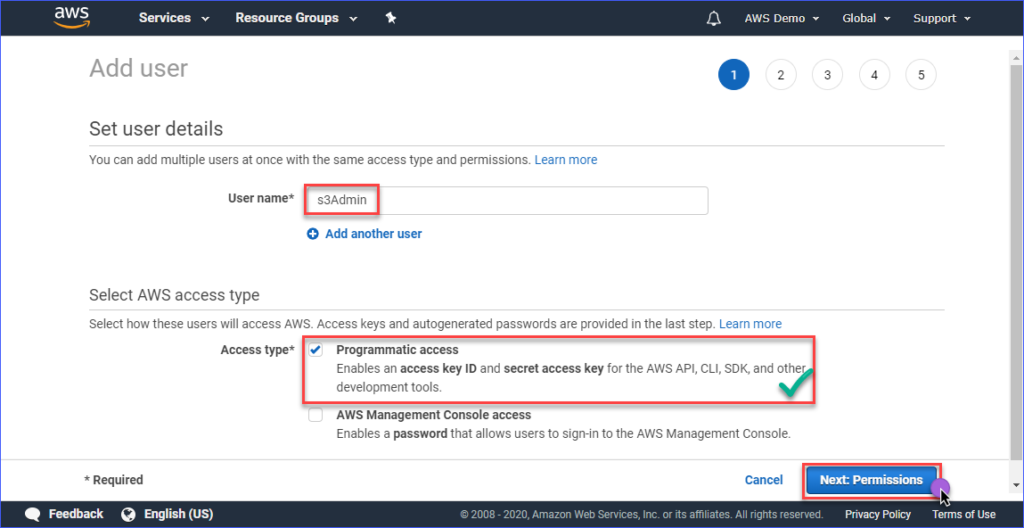
Type in the IAM user's name you are creating within the User name* box such as s3Admin. In the Access type* selection, put a check on Programmatic access. Then, click the Next: Permissions button.
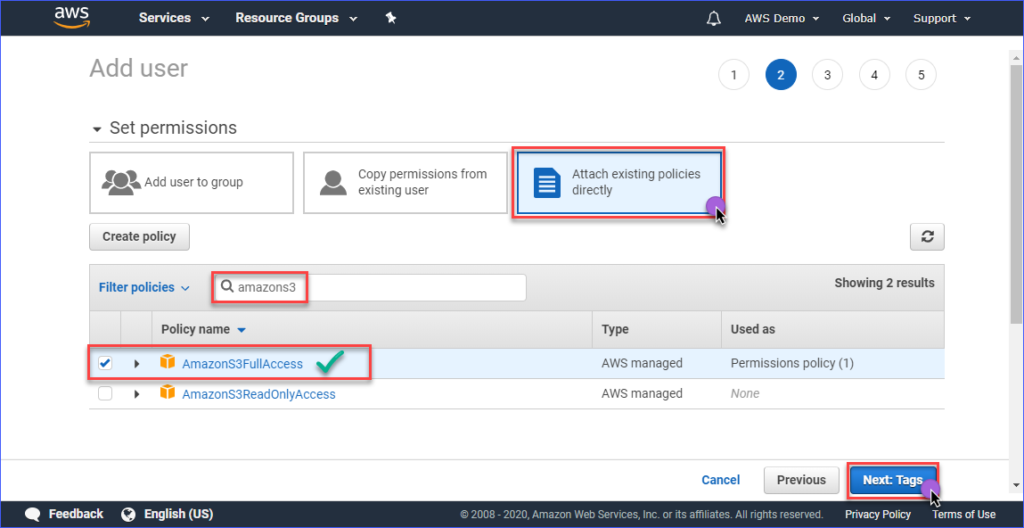
Next, click on Attach existing policies directly. And so, search for the AmazonS3FullAccess policy name and put a bank check on it. When done, click on Next: Tags.
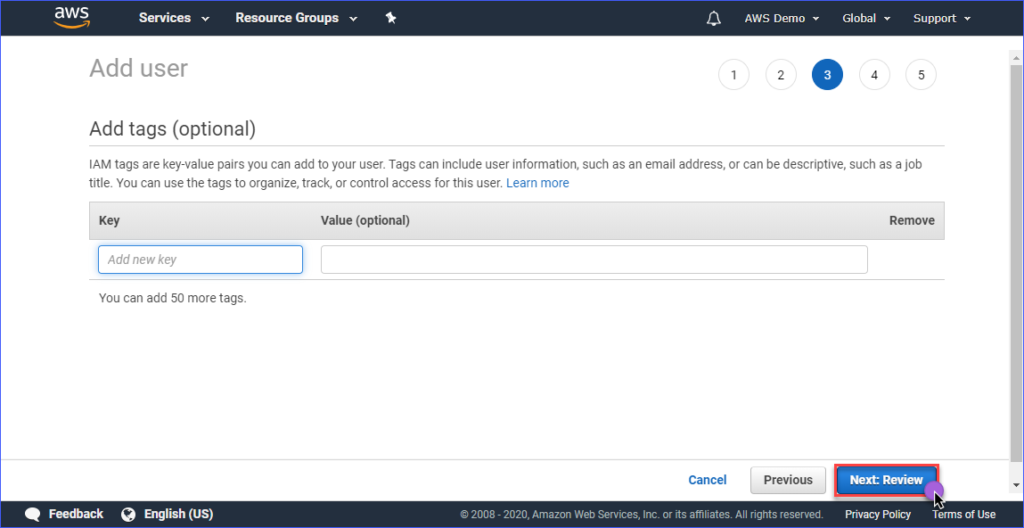
Creating tags is optional in the Add tags folio, and you can just skip this and click on the Adjacent: Review button.
In the Review page, you lot are presented with a summary of the new account being created. Click Create user.
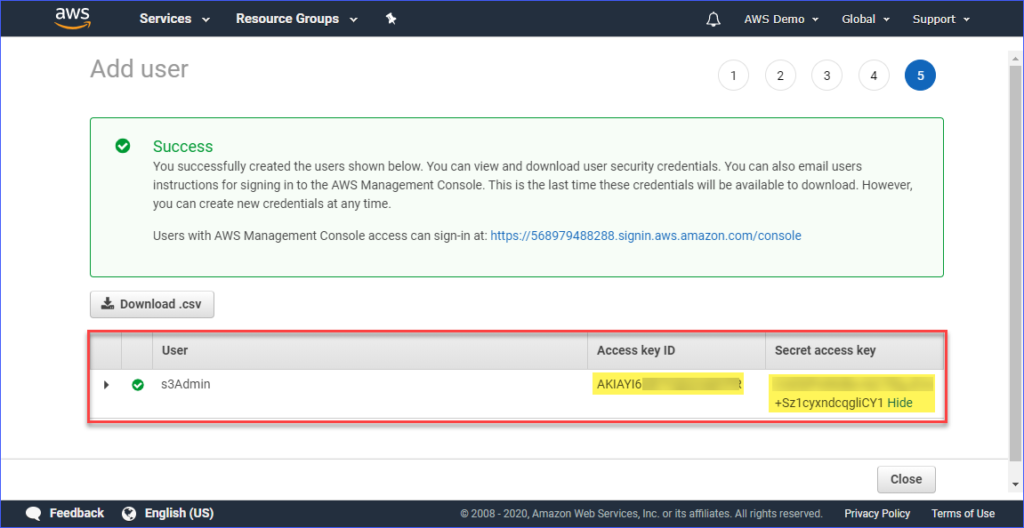
Finally, once the user is created, you must copy the Admission key ID and the Secret admission central values and save them for subsequently user. Note that this is the but fourth dimension that y'all can see these values.
Setting Up an AWS Profile On Your Computer
Now that you lot've created the IAM user with the appropriate admission to Amazon S3, the next step is to set upwards the AWS CLI profile on your computer.
This department assumes that you already installed the AWS CLI version 2 tool every bit required. For the profile creation, y'all will need the following data:
- The Admission key ID of the IAM user.
- The Clandestine access primal associated with the IAM user.
- The Default region proper noun is respective to the location of your AWS S3 bucket. You can check out the list of endpoints using this link. In this article, the AWS S3 bucket is located in the Asia Pacific (Sydney) region, and the corresponding endpoint is ap-southeast-2.
- The default output format. Employ JSON for this.
To create the profile, open PowerShell, and type the control below and follow the prompts.
Enter the Admission central ID, Secret access key, Default region name, and default output proper noun. Refer to the demonstration beneath.

Testing AWS CLI Access
After configuring the AWS CLI contour, you can confirm that the profile is working past running this command below in PowerShell.
The command higher up should list the Amazon S3 buckets that yous have in your account. The demonstration below shows the command in action. The result shows that list of bachelor S3 buckets indicates that the profile configuration was successful.

To learn about the AWS CLI commands specific to Amazon S3, you tin visit the AWS CLI Command Reference S3 page.
Managing Files in S3
With AWS CLI, typical file management operations tin can be washed like upload files to S3, download files from S3, delete objects in S3, and copy S3 objects to another S3 location. It's all merely a matter of knowing the right command, syntax, parameters, and options.
In the following sections, the surroundings used is consists of the post-obit.
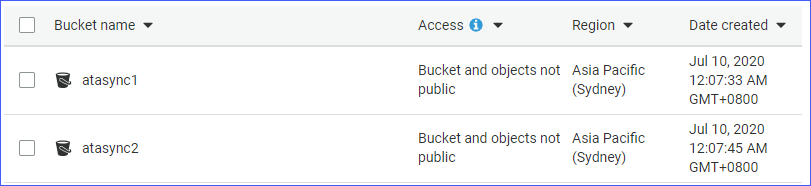
- Ii S3 buckets, namely atasync1and atasync2. The screenshot below shows the existing S3 buckets in the Amazon S3 panel.
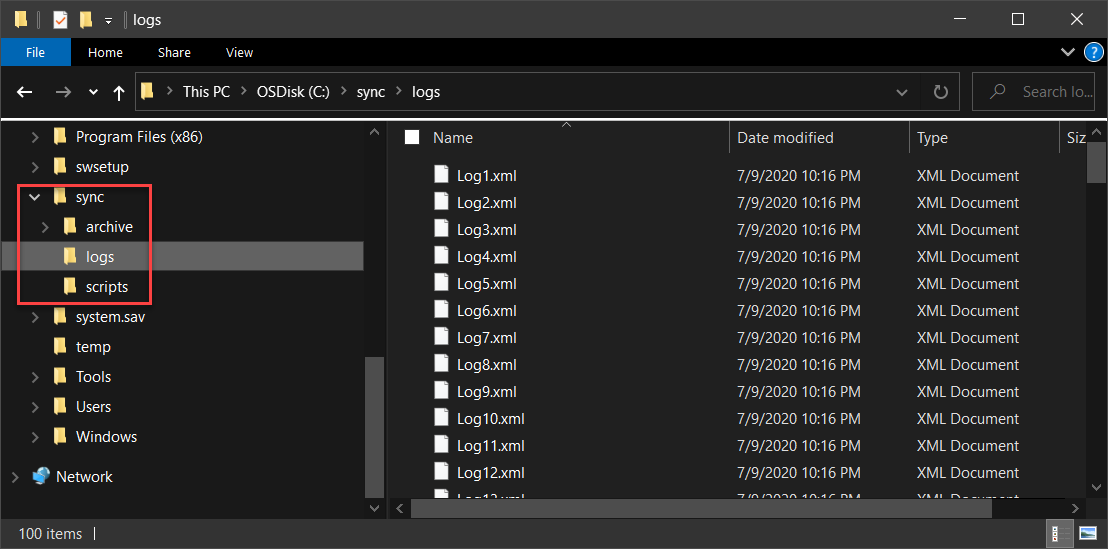
- Local directory and files located under c:\sync.
Uploading Individual Files to S3
When you upload files to S3, yous tin upload one file at a time, or by uploading multiple files and folders recursively. Depending on your requirements, you may choose one over the other that yous deem appropriate.
To upload a file to S3, you lot'll need to provide two arguments (source and destination) to the aws s3 cp command.
For instance, to upload the file c:\sync\logs\log1.xml to the root of the atasync1 saucepan, you can utilize the command below.
aws s3 cp c:\sync\logs\log1.xml s3://atasync1/ Annotation: S3 bucket names are ever prefixed with S3:// when used with AWS CLI
Run the higher up control in PowerShell, just alter the source and destination that fits your environment get-go. The output should expect similar to the demonstration below.

The demo to a higher place shows that the file named c:\sync\logs\log1.xml was uploaded without errors to the S3 destination s3://atasync1/.
Use the command below to list the objects at the root of the S3 saucepan.
Running the command higher up in PowerShell would result in a similar output, as shown in the demo beneath. As you tin meet in the output below, the file log1.xml is present in the root of the S3 location.

Uploading Multiple Files and Folders to S3 Recursively
The previous section showed you how to re-create a single file to an S3 location. What if you demand to upload multiple files from a folder and sub-folders? Surely you wouldn't want to run the aforementioned command multiple times for different filenames, right?
The aws s3 cp command has an option to procedure files and folders recursively, and this is the --recursive option.
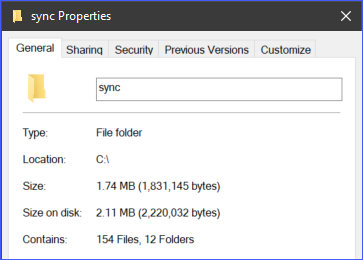
Equally an instance, the directory c:\sync contains 166 objects (files and sub-folders).
Using the --recursive selection, all the contents of the c:\sync binder will exist uploaded to S3 while likewise retaining the binder structure. To examination, use the example code below, but make certain to change the source and destination advisable to your environs.
Yous'll find from the code beneath, the source is c:\sync, and the destination is s3://atasync1/sync. The /sync key that follows the S3 bucket name indicates to AWS CLI to upload the files in the /sync folder in S3. If the /sync folder does not exist in S3, it will be automatically created.
aws s3 cp c:\sync s3://atasync1/sync --recursive The lawmaking to a higher place will result in the output, as shown in the demonstration below.

Uploading Multiple Files and Folders to S3 Selectively
In some cases, uploading ALL types of files is not the best selection. Like, when you only need to upload files with specific file extensions (e.1000., *.ps1). Another ii options available to the cp command is the --include and --exclude.
While using the command in the previous section includes all files in the recursive upload, the control below will include only the files that match *.ps1 file extension and exclude every other file from the upload.
aws s3 cp c:\sync s3://atasync1/sync --recursive --exclude * --include *.ps1 The demonstration beneath shows how the code above works when executed.

Another example is if you want to include multiple dissimilar file extensions, you lot volition need to specify the --include option multiple times.
The example command below will include merely the *.csv and *.png files to the copy command.
aws s3 cp c:\sync s3://atasync1/sync --recursive --exclude * --include *.csv --include *.png Running the code to a higher place in PowerShell would present you with a similar upshot, as shown below.

Downloading Objects from S3
Based on the examples yous've learned in this department, you tin also perform the re-create operations in reverse. Meaning, you lot can download objects from the S3 bucket location to the local car.
Copying from S3 to local would require you to switch the positions of the source and the destination. The source existence the S3 location, and the destination is the local path, like the one shown below.
aws s3 cp s3://atasync1/sync c:\sync Note that the same options used when uploading files to S3 are also applicable when downloading objects from S3 to local. For instance, downloading all objects using the command below with the --recursive option.
aws s3 cp s3://atasync1/sync c:\sync --recursive Copying Objects Betwixt S3 Locations
Autonomously from uploading and downloading files and folders, using AWS CLI, yous can also re-create or move files between two S3 bucket locations.
Y'all'll discover the control below using one S3 location every bit the source, and another S3 location as the destination.
aws s3 cp s3://atasync1/Log1.xml s3://atasync2/ The demonstration beneath shows you the source file being copied to some other S3 location using the command above.

Synchronizing Files and Folders with S3
You lot've learned how to upload, download, and copy files in S3 using the AWS CLI commands so far. In this section, you lot'll larn nigh one more than file functioning command available in AWS CLI for S3, which is the sync control. The sync command simply processes the updated, new, and deleted files.
At that place are some cases where you demand to keep the contents of an S3 bucket updated and synchronized with a local directory on a server. For example, you may have a requirement to go on transaction logs on a server synchronized to S3 at an interval.
Using the control below, *.XML log files located under the c:\sync folder on the local server will be synced to the S3 location at s3://atasync1.
aws s3 sync C:\sync\ s3://atasync1/ --exclude * --include *.xml The demonstration below shows that after running the command in a higher place in PowerShell, all *.XML files were uploaded to the S3 destination s3://atasync1/.

Synchronizing New and Updated Files with S3
In this side by side example, it is assumed that the contents of the log file Log1.xml were modified. The sync command should choice up that modification and upload the changes washed on the local file to S3, every bit shown in the demo below.
The control to use is still the same as the previous example.

Every bit you can run across from the output to a higher place, since only the file Log1.xml was changed locally, it was also the only file synchronized to S3.
Synchronizing Deletions with S3
By default, the sync control does non process deletions. Whatsoever file deleted from the source location is non removed at the destination. Well, non unless you use the --delete option.
In this next example, the file named Log5.xml has been deleted from the source. The command to synchronize the files will exist appended with the --delete option, as shown in the code below.
aws s3 sync C:\sync\ s3://atasync1/ --exclude * --include *.xml --delete When you run the command above in PowerShell, the deleted file named Log5.xml should also be deleted at the destination S3 location. The sample result is shown below.

Summary
Amazon S3 is an first-class resource for storing files in the cloud. With the utilise of the AWS CLI tool, the manner you use Amazon S3 is further expanded and opens the opportunity to automate your processes.
In this article, yous've learned how to use the AWS CLI tool to upload, download, and synchronize files and folders between local locations and S3 buckets. You've also learned that S3 buckets' contents can too be copied or moved to other S3 locations, too.
There can be many more use-example scenarios for using the AWS CLI tool to automate file direction with Amazon S3. Y'all tin fifty-fifty try to combine it with PowerShell scripting and build your own tools or modules that are reusable. It is up to you to find those opportunities and show off your skills.
Further Reading
- What Is the AWS Control Line Interface?
- What is Amazon S3?
- How To Sync Local Files And Folders To AWS S3 With The AWS CLI
Source: https://adamtheautomator.com/upload-file-to-s3/
0 Response to "Whats the Largest File You Can Upload to S3"
Postar um comentário